Flush toilet is one of the most ingenious inventions of man. We’re happy to use it every single day, not even noticing it …. Until it malfunctions and starts leaking. And then we panic.
How to fix a constantly running toilet?! The leakage leads to a constant unpleasant noise and a large water waste, so it needs to be fixed. And quickly! Naturally, the first thought would be ‘Call the plumber!’ Before doing that however, have a look at a few simple things you can do first and stop a running toilet yourself.
To find out what causes the leak and come up with a proper solution on how to fix it, let’s first get you introduced to the structure of the flush tank and how it works.
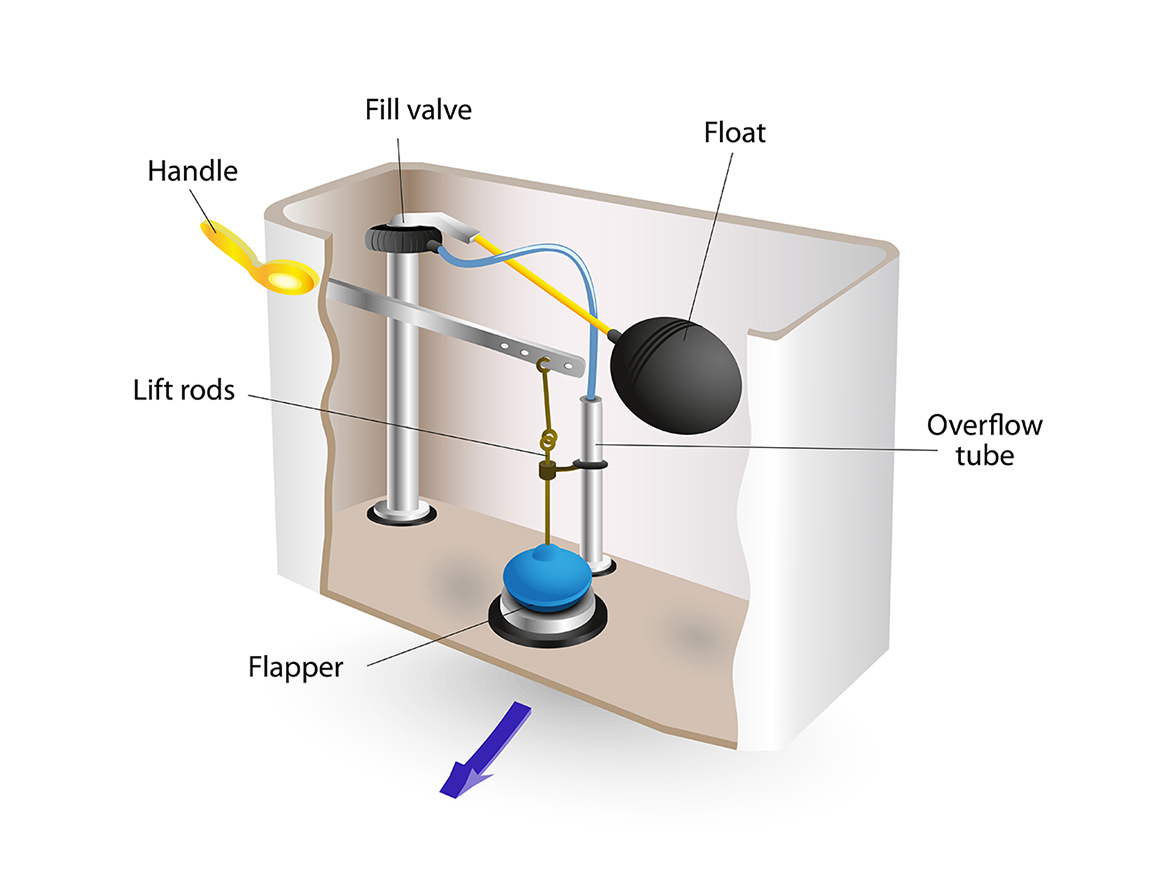
The unit comprises of a few elements:
- a toilet flush lever
- a rubber flapper blocking the tank water from running into the bowl
- a chain (lift rods) connecting the toilet flush lever with the flapper
- a pump which refills the tank after it empties
- a float ball which raises and lowers with the water level; it tells the pump when to go and stop
- an overflow tube, that controls the water level in the tank.
Now…. Toilets work on gravity. When you push down the lever it pulls the chain and lifts up the rubber flapper, allowing water to run out of the tank into the bowl. Once the water in the tank runs out, the flapper closes and allows the tank to fill again. The tank pump starts pumping water from the water supply inlet, and as the water level rises, it makes the float ball rise, too, and it finally closes the intake. The overflow tube controls the level of tank water and prevents it from flowing over the edge of the unit.
Your toilet leakage may be caused by the malfunctioning of any of the above items. To access them for a proper check-up, don’t forget to first stop the water supply to the tank. Flush the water to empty the tank. Then lift the lid and place it aside carefully. Time to find and fix the leakage problem!
Common causes and how to fix them
The flapper is that round rubber seal that stops water from draining from the tank into the toilet bowl. Most often, its poor condition is the cause for water constantly running from the tank. It can be broken, warped or simply dirty, which prevents it from sealing the tank’s drain properly. So, one of the first things to check is exactly this item.
Unhook the flapper from the base of the tank and pull it to the surface in order to get a closer look. In case the item is warped or broken, it needs to be replaced. Fortunately, this part is well available on the market and at a low price.
Often, however, the flapper’s malfunctioning is caused simply by a buildup of mineral deposits from the water that has accumulated on its surface and prevents it from closing properly. All you need then is clean these deposits off. Dip the part in a suitable bowl filled with vinegar and leave it for about 30 min. Then take it out and using an old toothbrush clean off any left dirty spots on its plastic and rubber parts. Place it back, fill the tank and flush.
Another item that might be causing water leakage is the chain, connecting the flapper with the toilet lever. If it is too short, it prevents the flapper from reaching the bottom of the tank. If it is too long, it may get caught underneath the flapper. In either case, the flapper cannot seal the tank’s drain and water keeps running.
So, simply adjust the length of the chain so that the flapper is allowed to properly seal the tank. This will need a few flushing attempts. Each time, watch carefully the position of the flapper and how it is affected by the length of the chain.
The float assembly controls the level of the water in the tank. Its malfunctioning is one of the most common causes for a running toilet. After flushing, the tank starts getting filled with fresh water. The plastic ball floating on the water surface keeps rising and when the water reaches the set level, this item closes the pump and the water inlet.
In a full toilet tank the water level should be about 1 to 1.5 inches (2.5 to 3.8 cm) down from the top of the overflow tube. This level is regulated by the height the float is set to rise to, so you need to carefully check this out and adjust accordingly. The easiest way is to slightly bend down the metal arm holding the floating ball. Some newer models have also float adjustment screws on the top that can be used to conveniently do the according adjustments.
As with the flapper, the float, too, may have stopped functioning correctly because of accumulated lime scale or other water deposits. One solution is to disassemble the unit and clean it. Pay most attention to the diaphragm and the O-rings for debris, and clean them thoroughly.
Finally, when the unit is too old, it may be damaged and the best solution is to replace it with a new one.
If neither of the above attempts has stopped the water leakage in the toilet, you should check for possible problems with the sealing fittings between the tank and the water supply line. Check these items and make sure they are tightly mounted. If the leakage persists, remove the water supply pipe and replace the washers between the shutting valve and the toilet tank.
Preventive measures
As you have already learnt, deposits of lime scale etc. water minerals and even bacteria can accumulate in layers on the surface of the parts in the flush toilet tank, preventing them from functioning properly and even damaging them.
To avoid this problem and remove slime or even fungal buildup, treat the tank once every 6 weeks with ½ to ¾ cup of bleach. Pour the bleach into the tank immediately after flushing. At that moment the flapper drops down and seals the drain, while the swirling action of the incoming water mixes the bleach in the tank and the product acts better onto the surfaces of the parts.
With time, the rubber part of the flapper may become hard and this may start causing problems with the proper functioning of the part. To prevent this, coat the sealing rubber of the flapper with vaseline, using rubber gloves. This will keep it moist and elastic for a longer time. You may also use a product known as the Plumber Grease.
Many think that by reducing the amount of water of each flush will save on water consumption and will even prevent from water leakage. To reduce the tank capacity people would often place a brick or another heavy foreign object into the tank. Actually, this may cause serious damage to the unit and have quite the opposite effect.
A contemporary toilet tank needs 1.6 gallons to flush properly. If however you are sure about reducing this amount of water, placing in the tank a small plastic bottle filled with water is a good option. This bottle needs to be replaced from time to time when the plastic becomes brittle.
If water leakage occurs late at night, the best you can do is stop the water supply to the tank and wait until the next day. In daylight you’ll have more time to check the problem and fix it, and the hardware or plumbing supply store is open and repair parts are available.


